How to Import MCAT Decks into Anki (Both Methods, Step by Step)
✓ After this tutorial: A working MCAT deck fully imported into Anki, with cards unsuspended by topic and deck options configured so you can start your first study session immediately.
A step-by-step tutorial for pre-med students who have chosen an MCAT Anki deck and need to get it working fast — covering the direct .apkg file method for static community decks and the AnkiHub subscription method for the AnKing MCAT deck, plus post-import configuration and fixes for the most common failure states.
Two Import Paths — and What Goes Wrong
Getting an MCAT deck into Anki should take about ten minutes. For a lot of students, it takes three hours — because they hit one of three common failure states and have no idea what caused it.
The first thing to understand is that there are two completely different import methods, and which one you need depends entirely on which deck you downloaded. Mixing up the methods — or not knowing that AnkiHub exists — is the single most common reason students get stuck.
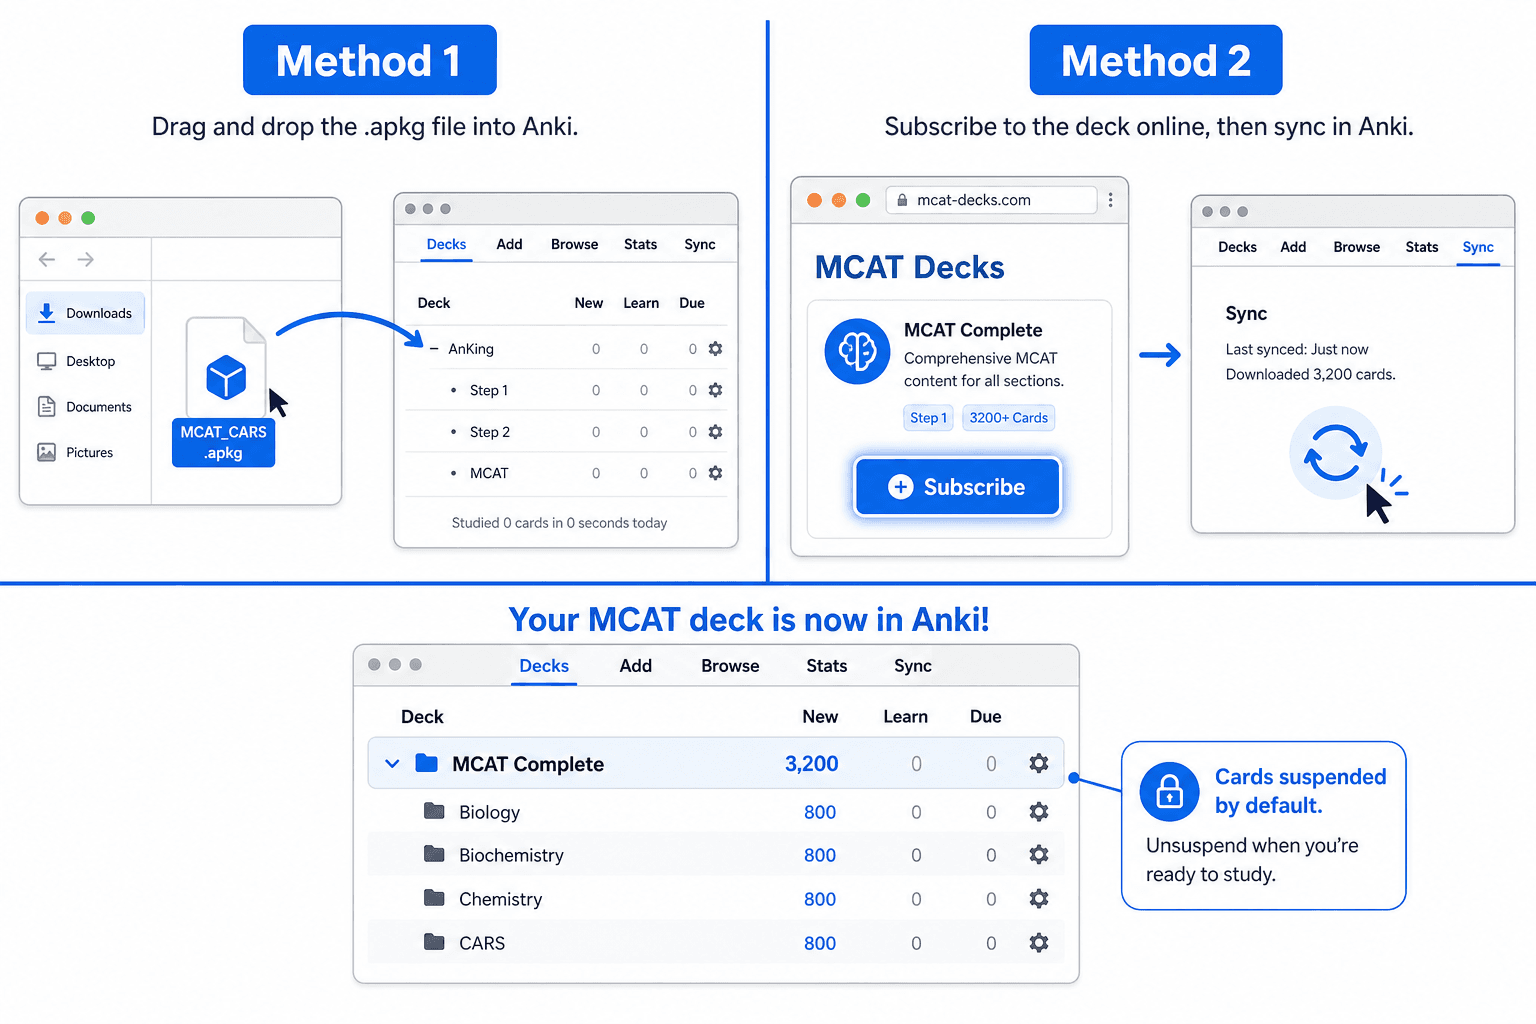
- Method 1 — .apkg file import: for static community decks (MileDown, JackSparrow2048, Ortho528, Bouras). You download a file and drag it into Anki.
- Method 2 — AnkiHub subscription: for the AnKing MCAT deck only. You install an add-on, subscribe through a website, and sync.
Beyond choosing the right method, three failure states trip up almost everyone on their first import:
- The deck shows 0 cards — this is expected behavior, not a failed import. All cards in large MCAT decks are suspended by default.
- Decks merge or combine — happens when two decks share Note IDs (MileDown and AnKing MCAT share content ancestry). The fix is separate Anki profiles.
- Images don't load — typically a media sync issue, resolved through Tools → Check Media.
This tutorial covers both import methods in full, explains what to do immediately after import, and gives you direct fixes for each of those failure states.
Before You Start: Prerequisites Checklist
Confirm all three of these before attempting either method. Skipping any one of them causes problems that look like import failures but aren't.
| Requirement | Why It Matters | Where to Get It |
|---|---|---|
| Anki desktop installed (Windows, macOS, or Linux) | Both import methods require the desktop app — the mobile app and AnkiWeb browser cannot import decks | ankiweb.net — free download |
| AnkiWeb account created | Required for cloud sync so cards appear on your phone and are backed up | ankiweb.net — free account |
| Know which deck you downloaded | Determines which import method applies — .apkg file = Method 1; AnKing MCAT via AnkiHub = Method 2 | Check your download source or the deck's community page |
Method 1: Import a Static Deck via .apkg File
This method applies to MileDown (~2,900 cards), JackSparrow2048 (~6,000 cards), Ortho528 (~4,300 cards), Bouras (13,000+ cards), and any other MCAT deck distributed as a downloadable .apkg file. The import itself takes under two minutes.
- Locate the .apkg file. Move it somewhere easy to find — your Desktop or Downloads folder works. The filename will end in .apkg (for example, MileDown.apkg or Bouras_MCAT.apkg).
- Open Anki. Make sure you're on the main screen showing your deck list — not inside a deck or a study session.
- Drag the .apkg file onto the Anki window. Drop it anywhere on the main deck list area. An import progress dialog will appear, showing the number of notes being added.
- Alternatively, use File → Import. In the top menu bar, click File, then Import, then navigate to and select your .apkg file. This produces the same result as drag-and-drop.
- Click Close on the confirmation dialog. The dialog shows how many notes were imported. Click Close — do not click anything else.
- Confirm the deck appears in your deck list. You should see the deck name (e.g., "MileDown" or "Bouras") in the main window. The card count will show 0 — this is normal and is explained in the Post-Import Setup section below.
Method 2: Install the AnKing MCAT Deck via AnkiHub
The AnKing MCAT deck is a composite deck built from MileDown, Abdullah, Coffin, and MrPankow content, with weekly updates pushed through AnkiHub. Because it is a live-updated deck, it cannot be distributed as a static .apkg file — you must install it through the AnkiHub add-on.
This method has four steps. Each one must be completed in order.
- Install the AnkiHub add-on in Anki. In Anki, go to Tools → Add-ons → Get Add-ons. Enter the AnkiHub add-on code (available on the AnkiHub website). Click OK and restart Anki when prompted.
- Log in to your AnkiHub account inside the add-on. After Anki restarts, go to Tools → AnkiHub. A login prompt will appear. Enter the email and password for your AnkiHub account. If you don't have one, create a free account at ankihub.net before this step.
- Subscribe to the AnKing MCAT deck on the AnkiHub website. Open a browser and go to ankihub.net. Find the AnKing MCAT deck page and click Subscribe. This links the deck to your account so Anki can pull it during sync.
- Sync from inside Anki. Back in Anki, click the sync button (the cloud icon in the top-right corner) or go to Tools → AnkiHub → Sync. The deck will download. Depending on your connection, this may take several minutes.
- Confirm the deck appears in your deck list. Look for the AnKing MCAT deck in your main window. The card count will show 0 — again, this is expected.
Post-Import Setup: Unsuspending Cards and Configuring Deck Options
Every large MCAT deck — regardless of which import method you used — will show 0 new cards after import. This is not a bug. It is intentional design.
All cards in these decks are suspended by default. Suspended cards exist in the deck but are excluded from study sessions. You must manually unsuspend cards to make them active. The reason decks ship this way is that a 6,000-card or 13,000-card deck would be unmanageable if every card became active at once.
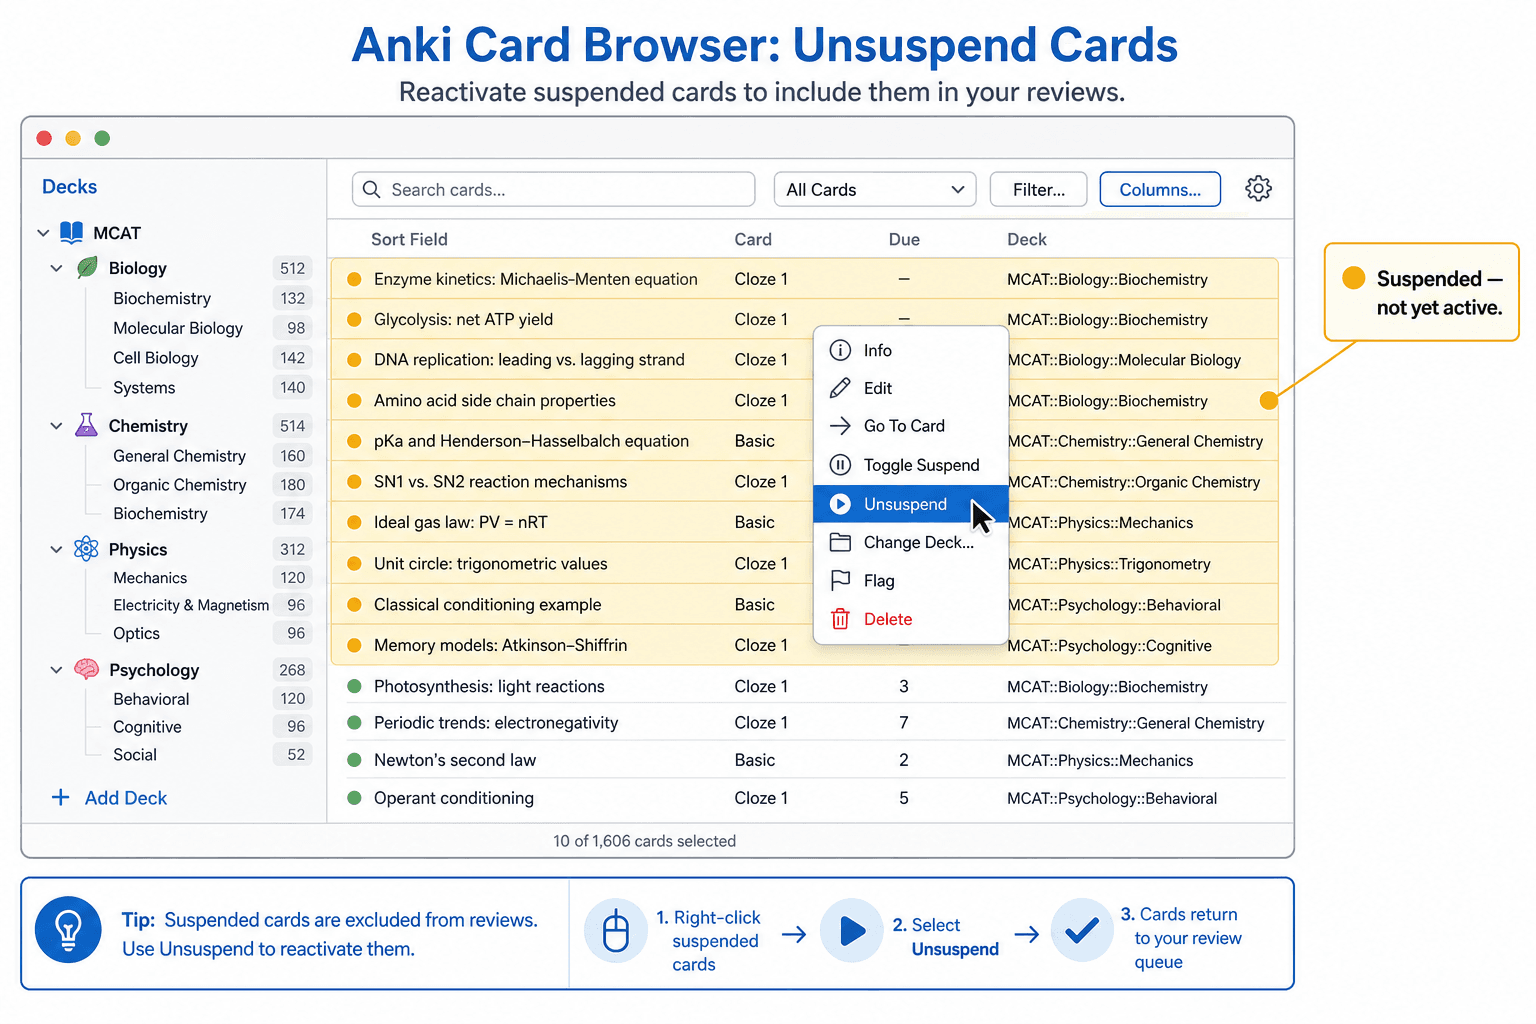
How to Unsuspend Cards by Topic
- Click Browse in the Anki main window. This opens the Browser, which shows all cards in your collection.
- Navigate to the subdeck or topic you are currently studying. In the left sidebar, expand your MCAT deck to see its subdecks or tag groups. Click the subject you want to activate (e.g., Biochemistry, Biology, Psychology).
- Select the cards you want to unsuspend. Click the first card in the list, then Shift+Click the last card in the range to select a block. Suspended cards appear highlighted in yellow.
- Right-click the selection and choose Unsuspend. The cards will change from yellow to white, indicating they are now active and will appear in your study sessions.
Recommended Deck Options for Large MCAT Decks
Before you start your first study session, configure your deck options. The default Anki settings are not calibrated for a deck with thousands of suspended cards being unsuspended incrementally over months. These settings are specifically suited to that workflow.
To access deck options: click the gear icon next to your MCAT deck in the main window, then select Options.
| Setting | Recommended Value | Why This Value for MCAT Decks |
|---|---|---|
| New Cards per Day | 20 to start; increase to 50 over time | Prevents new card overload when you're unsuspending topic-by-topic across a long study schedule |
| Maximum Reviews per Day | 9999 | Removes the review cap so your full due-card queue is always accessible — never let reviews pile up artificially |
| Learning Steps | 15m 1d 6d | Three-step learning phase before a card graduates; appropriate for dense MCAT content that requires repeated exposure |
| Graduating Interval | 15 days | Cards move to a 15-day interval after completing learning steps |
| Easy Interval | 60 days | Cards marked Easy jump to a 60-day interval — use sparingly on MCAT material |
| Insertion Order | Sequential | New cards appear in deck order rather than randomly, keeping content organized by topic |
| Relearning Steps | 10m | Lapsed cards return with a 10-minute relearning step before re-entering the review queue |
| Leech Threshold | 8 | Cards flagged as leeches after 8 failed reviews |
| Leech Action | Tag Only | Leeched cards are tagged but not suspended, so you can review them manually rather than losing them |
Common Problems and How to Fix Them
These are the four failure states that appear most frequently in MCAT Anki communities. Each has a specific cause and a specific fix.
| Problem | Cause | Fix |
|---|---|---|
| Deck shows 0 cards after import | All cards are suspended by default — this is intentional, not a failed import | Open Browse, navigate to a subdeck or topic, select cards, right-click → Unsuspend |
| Decks merging or combining | MileDown and AnKing MCAT share Note IDs due to shared content ancestry — importing both into the same profile merges them | Use separate Anki profiles for each deck (see next section) |
| Images not loading | Media files did not sync correctly during import | Go to Tools → Check Media, then run a full sync |
| Only 14 cards showing | You are looking at the 'Getting Started with Anki' tutorial deck that AnkiHub installs automatically, not your MCAT deck | Scroll down in your deck list — your MCAT deck is a separate entry below the tutorial deck |
Using Separate Anki Profiles to Prevent Deck Merging
If you plan to use both MileDown and the AnKing MCAT deck, you cannot keep them in the same Anki profile. Because the AnKing MCAT deck was built using MileDown as a source, both decks share Note IDs for overlapping content. When Anki encounters two notes with the same ID, it merges them — cards from one deck overwrite or combine with cards from the other.
The solution is to give each deck its own Anki profile. Profiles are completely isolated environments — separate card collections, separate review histories, separate settings. Switching between them takes about three seconds.
How to Create and Switch Between Profiles
- Go to File → Switch Profile. This opens the Profile Manager.
- Click Add to create a new profile. Name it something specific — for example, "AnKing MCAT" or "MileDown." Each profile stores its own decks, settings, and sync credentials.
- Select the new profile and click Open. Anki will restart into the new profile. It will be empty — no decks, no cards.
- Import your deck into this profile. Use Method 1 or Method 2 as appropriate for the deck you want in this profile.
- To switch between decks: go to File → Switch Profile, select the profile you want, and click Open. Your other deck and all its review data will be waiting exactly as you left it.
Quick-Start Summary Checklist
Use this checklist to confirm you have completed every required step before closing this tutorial and starting your first study session.
- Anki desktop installed and AnkiWeb account created
- Identified which import method applies to your chosen deck (Method 1 for .apkg files; Method 2 for AnKing MCAT via AnkiHub)
- Import completed — deck is visible in the Anki main window deck list
- Understood that 0 cards showing is expected — all cards are suspended by default
- Opened the Browser, navigated to the first topic you are studying, and unsuspended a manageable batch of cards (not all cards at once)
- Deck options configured: New Cards/Day 20, Maximum Reviews 9999, Learning Steps 15m 1d 6d, Graduating Interval 15, Insertion Order Sequential, Leech Action Tag Only
- If running multiple MCAT decks: created separate Anki profiles for each deck to prevent Note ID merging
- If using AnkiHub: confirmed the MCAT deck appears separately from the 14-card 'Getting Started with Anki' tutorial deck
- AnkiWeb sync completed so cards are backed up and accessible on mobile
Next Steps
- How to Create a Quizlet Study Set: Manual, Import, and AI Methods →
A step-by-step guide for high school and college students who want to build their own Quizlet study sets from scratch — covering manual entry, bulk text import, and AI generation from notes, plus card design tips and folder organization.
- How to Set Up Anki from Scratch: A Complete Beginner's Guide →
A step-by-step tutorial for first-time Anki users — covering installation on every platform, enabling FSRS settings, creating your first deck and cards, syncing across devices with AnkiWeb, and avoiding the six mistakes that cause most beginners to quit within the first week.
Comments
Join the discussion with an anonymous comment.